
How to start cuttings in a frigid frame: Eliot Coleman gardening advice
Are you ready to start the start of the gardening season? You can start with a frigid frame now. The frigid frame uses the heat of the sun before it is hot enough to allow seedlings without outside protection.
Basically, it consists of a garden bed surrounded by an angle frame and a glass window covered. All vegetables except the most loving heat (such as tomatoes and peppers) can be started in a frigid frame. The biggest advantage of growing with a frigid frame is that your plants can immediately get into the soil, without surviving unnecessary stress associated with the reduction of roots in trays.
The following fragment comes from Four -one harvest By Eliot Coleman. Has been adapted to the network.
(All illustrations of Kathy Bray. Cover photo courtesy of Barbra Damrosch.)
Your frigid frame can be used as a greenhouse to start seedlings.
You can utilize it for all seedlings that are transplanted, except for the early immobile of heat lovers, such as tomatoes, peppers and cucumbers. They should be launched in a clear window at home. For all the remaining, the frigid frame is an ideal place to start development. When you start growing seedlings in a frigid frame, you will consider it so uncomplicated and successful that you will never return to the apartments on the window sills. Here’s how to do it:
Spread a pot mixture with a depth of about two to three inches in any part of the frame that you want to utilize for seedlings. Lay 3-inch boards around the edge as a border, and then treat this area as if it was flat: Make furrows, fall evenly placed seeds, cover them shallowly, mark them with the name and date on a diminutive stake, and water them with a slightly fine sprinkle. Rows can be as close to each other as in the apartment. The spaces of the space are evenly in line, so they will not be crowded. We always try to avoid plant stress at all stages of cultivation. It takes a little more time, but the results are worth it.
When the cuttings are up, move them to the neighboring section of the frame, which also has a 2 -inch cover of pot mixture above the soil. Do it as soon as you deal with the cuttings. As a reason, the younger you transplant the seedling, the better. Cop under each of them with a diminutive, pointed pin, lifting and loosening the roots when extracting them from the soil. Always be dainty with seedlings. Keep them by the leaf, not the stem, so they don’t crush the essential parts if you squeeze too strenuous.
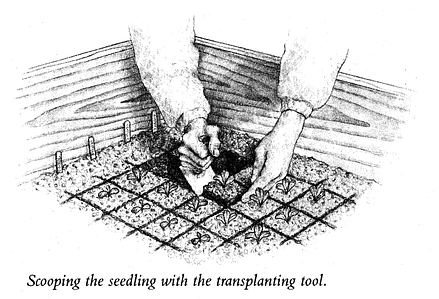
Poke holes in the potted soil of the adjacent section with a stake to make room for the roots, and then slightly hide them. A significant distance for all seedlings is 3 inches from each other. When they are vast enough to transplant into the garden, utilize a knife to cut the soil into cubes with seedling in the middle of each of them. It’s like cutting out a tray of cakes. If you make sure that the soil is saturated (sprinkle if necessary if necessary), the blocks will remain nice. You can utilize a glass bricklayer or angle glass to cut under each cube, lift it and set it in a tray for transport to a indefinite garden house.
Crilling in a frigid frame has many advantages
 No apartments are necessary. There is no soil mess at home. Seedlings will be resistant because the frigid frame is not artificially heated. All additional sclerosis is easily achieved, opening the lights slightly wider.
Finally, watering is more forgiving because your cuttings are connected to the ground and cannot arid as quickly as possible within circumscribed boundaries of the apartment. Therefore, the occasional deployment of watering is not catastrophic.
An indirect transplant in a row seedlings up to 3 in 3 -inch gifts means that cutting transplant is a two -stage process. We believe that it is worth the effort, because it was found that an intermediate step stimulating increased root growth, which causes a slightly more energetic transplant. You can do it as a one -stage process, simply starting with 3 to 3 inches configuration and planting three seeds at each square. After their appearance, the shadow to the best in every square and you act as before.
 With some crops we utilize a Dutch idea called the multiplier and sit four or more seeds on each square without intention to slender them off. This allows us to grow transplants in groups, not as singles. Onions will be a good example of how to do it. Five seeds together. Plan the germination of four seeds. When the onion cuttings are vast enough to go to the garden, cut the blocks as usual and put them on a distance of 10 by 12 inches.
If you had individual plants in rows, they would be distant 3 inches from each other. Four plants in a clump every 12 inches in a row are the same average distance as one plant for 3 inches. Each onion is allowed as much as the total garden space and the performance is the same. Growing onion. Together, move to the side gently, and in the sets they lie in a number of diminutive circles, not individual rows. If all seeds germinate and there are five onions in each tuft, this is not a problem.
In addition to onions, you can utilize a technique multiplied with early beetroot, broccoli, cabbage, pores, shallot and spinach. This system is not only more productive, because four plants can be transplanted as rapid as one, but it can also be used to control the size if necessary. For example, the clump of broccoli will give three or four smaller central heads, not one vast. For many families, the smaller size of the unit is more desirable.